> ## Documentation Index
> Fetch the complete documentation index at: https://ampersand-24eb5c1a-feat-always-enabled-object.mintlify.site/llms.txt
> Use this file to discover all available pages before exploring further.
# HubSpot
## What's Supported
### Supported Actions
The Hubspot connector supports:
* [Read Actions](/read-actions), including full historic backfill and incremental reads.
* [Subscribe Actions](/subscribe-actions).
* [Write Actions](/write-actions).
* [Proxy Actions](/proxy-actions), using the base URL `https://api.hubapi.com`.
### Supported Objects
The Hubspot connector supports writing to and reading from the following objects:
* [Companies](https://developers.hubspot.com/docs/api/crm/companies)
* [Contacts](https://developers.hubspot.com/docs/api/crm/contacts)
* [Deals](https://developers.hubspot.com/docs/api/crm/deals)
* [Emails](https://developers.hubspot.com/docs/guides/api/crm/engagements/email)
* [Calls](https://developers.hubspot.com/docs/guides/api/crm/engagements/calls)
* [Meetings](https://developers.hubspot.com/docs/guides/api/crm/engagements/meetings)
* [Notes](https://developers.hubspot.com/docs/guides/api/crm/engagements/notes)
* All other [standard CRM objects](https://developers.hubspot.com/docs/guides/api/crm/understanding-the-crm#object-type-ids)
* Custom CRM objects
For each of these objects, the connector supports:
* Standard fields, [here's a list of the standard fields](https://docs.google.com/spreadsheets/d/1FGc9zT_J9dyGghDxvqeioAva-5Gj7-2DQzKNMrbrPvw/view?usp=sharing) for common Hubspot objects
* Custom fields
The Hubspot connector only supports reading from the following objects:
* [Lists](https://developers.hubspot.com/docs/guides/api/crm/lists/overview). Please note that for Lists, incremental reads is not supported, which means that a full read of all Lists is done for each scheduled read. Incremental read is supported for other objects listed above.
* Users and owners, please refer to the section below.
#### Reading users and owners
In Hubspot, users and owners both refer to people that are using the Hubspot workspace. Each user is assigned an owner ID, and this is the ID that is used to identify owners for Deals, Contacts, etc.
If you want to know the users in your customer's Hubspot workspace, then add `users` as an object in `amp.yaml`.
```YAML
- objectName: users
destination: defaultWebhook
schedule: "0 0 * * *" # every day
requiredFields:
- fieldName: hs_object_id
mapToName: userId
- fieldName: hubspot_owner_id
mapToName: ownerId
- fieldName: hs_email
mapToName: emailAddress
- fieldName: hs_family_name
mapToName: lastName
- fieldName: hs_given_name
mapToName: firstName
- fieldName: hs_createdate
mapToName: createTime
- fieldName: hs_lastmodifieddate
mapToName: updateTime
- fieldName: hs_deactivated
mapToName: isDeactivated
```
### Example Integration
For an example manifest file of a Hubspot integration, visit our [samples repo on Github](https://github.com/amp-labs/samples/blob/main/hubspot/amp.yaml).
## Before You Get Started
To integrate HubSpot with Ampersand, you need to [Create a HubSpot Account](#create-a-hubspot-account) and obtain the following credentials from a HubSpot App:
* Client ID
* Client Secret
* Scopes Requested
### Create a HubSpot Account
You need a **HubSpot** account to connect with Ampersand. If you do not have a HubSpot account, here's how you can sign up:
* Go to the [HubSpot Developer site](https://app.hubspot.com/signup-hubspot/developers) and sign up for a free developer account.
* Sign up using your preferred account.
* Verify your email and complete the registration process.
## Creating a HubSpot App
Once your HubSpot Developer account is ready, you need to create a HubSpot application. Learn more about creating a HubSpot application here.
1. Log in to Your [HubSpot Developer Dashboard](https://app.hubspot.com/signup-hubspot/developers?_ga=2.135957745.1749898245.1717410216-1887335227.1717410216&_gl=1*757l65*_ga*MTg4NzMzNTIyNy4xNzE3NDEwMjE2*_ga_LXTM6CQ0XK*MTcxNzQxMDIxNS4xLjEuMTcxNzQxMDg2OS40OS4wLjA.\&step=existing_user).
2. Click **Create an app**.
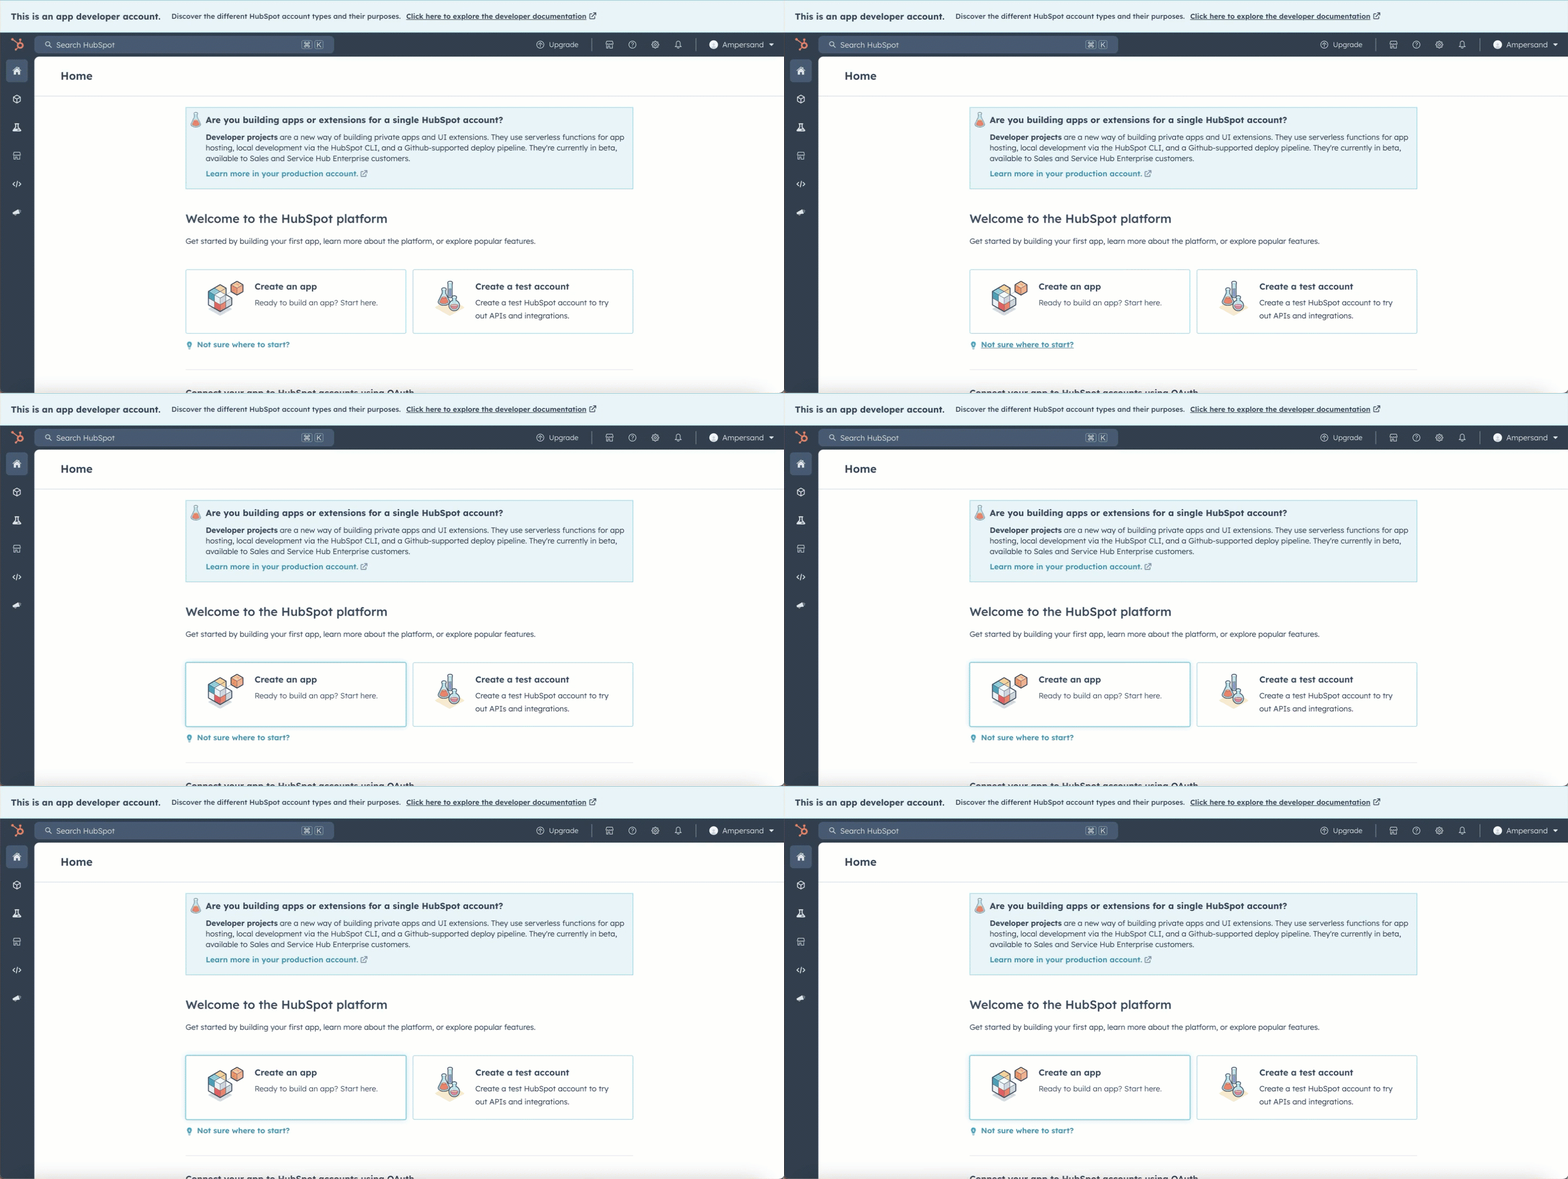 3. In the **Basic Info** section:
1. Enter **Public app name**.
2. Add **Description**, **Logo**, and **Support contact** info for your app.
4. Click **Save changes**.
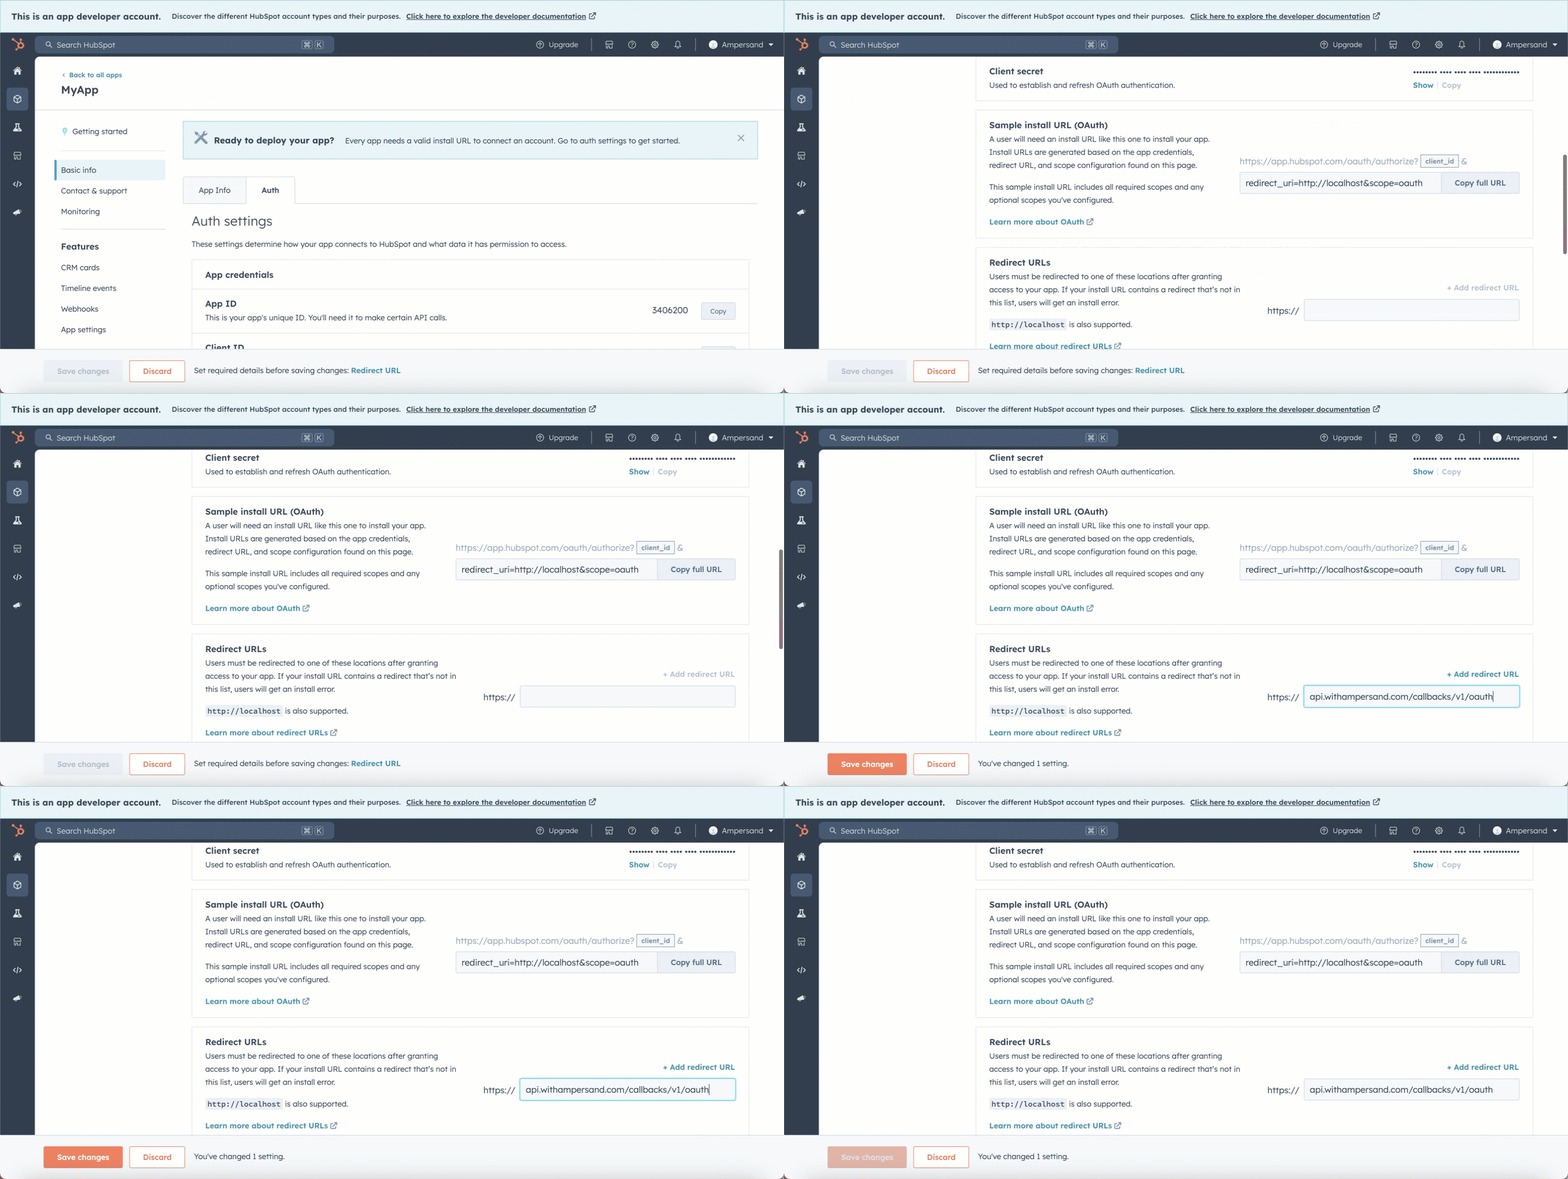
5. Click on the **Auth** tab to review your Auth settings. This section includes the *client ID* and *client secret* which you need to add to the Ampersand console while setting up hubspot in Ampersand. You'll need this information for initiating an OAuth connection between your app and HubSpot.
6. In the **Redirect URLs** section, add the Ampersand Callback URL: `https://api.withampersand.com/callbacks/v1/oauth`.
3. In the **Basic Info** section:
1. Enter **Public app name**.
2. Add **Description**, **Logo**, and **Support contact** info for your app.
4. Click **Save changes**.
5. Click on the **Auth** tab to review your Auth settings. This section includes the *client ID* and *client secret* which you need to add to the Ampersand console while setting up hubspot in Ampersand. You'll need this information for initiating an OAuth connection between your app and HubSpot.
6. In the **Redirect URLs** section, add the Ampersand Callback URL: `https://api.withampersand.com/callbacks/v1/oauth`.
 7. In the **Scopes** section, select the scopes you'd like to use in your application. You will need add the same scopes in Ampersand to set up your app.
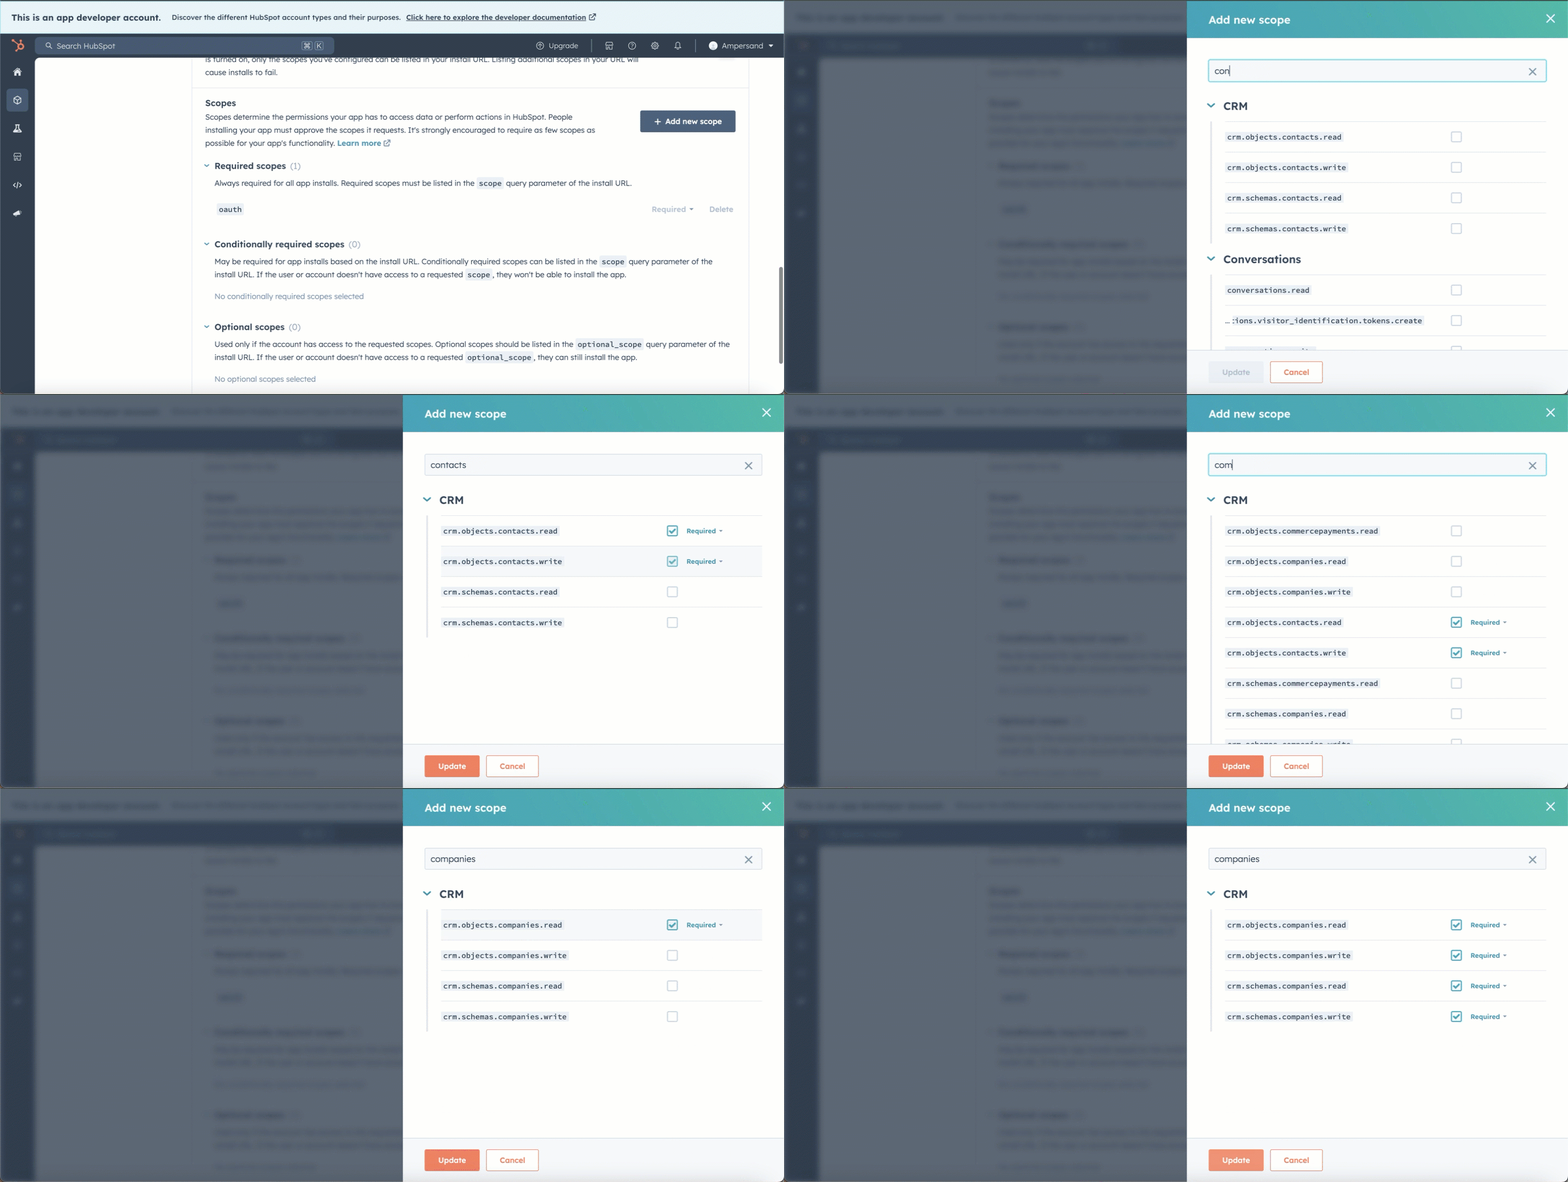 8. Click **Save changes**.
### Obtaining Client Id, Client Secret, and Scopes section
Here's how to grab the credentials you'll need:
1. Go to **Manage Apps** in HubSpot and select your app.
2. Click on the **Auth** tab.
3. You will find your *Client ID* and *Client Secret* under the **App Credentials** section.
4. The **Scopes** section lists the permissions your app has in HubSpot.
## Add HubSpot App Details in Ampersand
> ❕ Before adding the HubSpot App Details in Ampersand, ensure you have obtained the client ID, client secret, and scopes from HubSpot.
>
> For instructions on how to obtain these details, refer to the section on [Obtaining Client ID, Client Secret, and Scopes](https://docs.withampersand.com/docs/hubspot-guide#obtaining-client-id-client-secret-and-scopes-section) .
1. Log in to your [Ampersand Dashboard](https://dashboard.withampersand.com).
2. Select the project where you want to add the Hubspot App.
8. Click **Save changes**.
### Obtaining Client Id, Client Secret, and Scopes section
Here's how to grab the credentials you'll need:
1. Go to **Manage Apps** in HubSpot and select your app.
2. Click on the **Auth** tab.
3. You will find your *Client ID* and *Client Secret* under the **App Credentials** section.
4. The **Scopes** section lists the permissions your app has in HubSpot.
## Add HubSpot App Details in Ampersand
> ❕ Before adding the HubSpot App Details in Ampersand, ensure you have obtained the client ID, client secret, and scopes from HubSpot.
>
> For instructions on how to obtain these details, refer to the section on [Obtaining Client ID, Client Secret, and Scopes](https://docs.withampersand.com/docs/hubspot-guide#obtaining-client-id-client-secret-and-scopes-section) .
1. Log in to your [Ampersand Dashboard](https://dashboard.withampersand.com).
2. Select the project where you want to add the Hubspot App.
 3. Select **Provider apps**.
4. Select *HubSpot* from the **Provider** list.
5. Enter the previously obtained *Consumer Key* in the **Client ID** field and the *Consumer Secret* in the **Client Secret** field.
6. Enter the scopes set for your application in HubSpot.
3. Select **Provider apps**.
4. Select *HubSpot* from the **Provider** list.
5. Enter the previously obtained *Consumer Key* in the **Client ID** field and the *Consumer Secret* in the **Client Secret** field.
6. Enter the scopes set for your application in HubSpot.
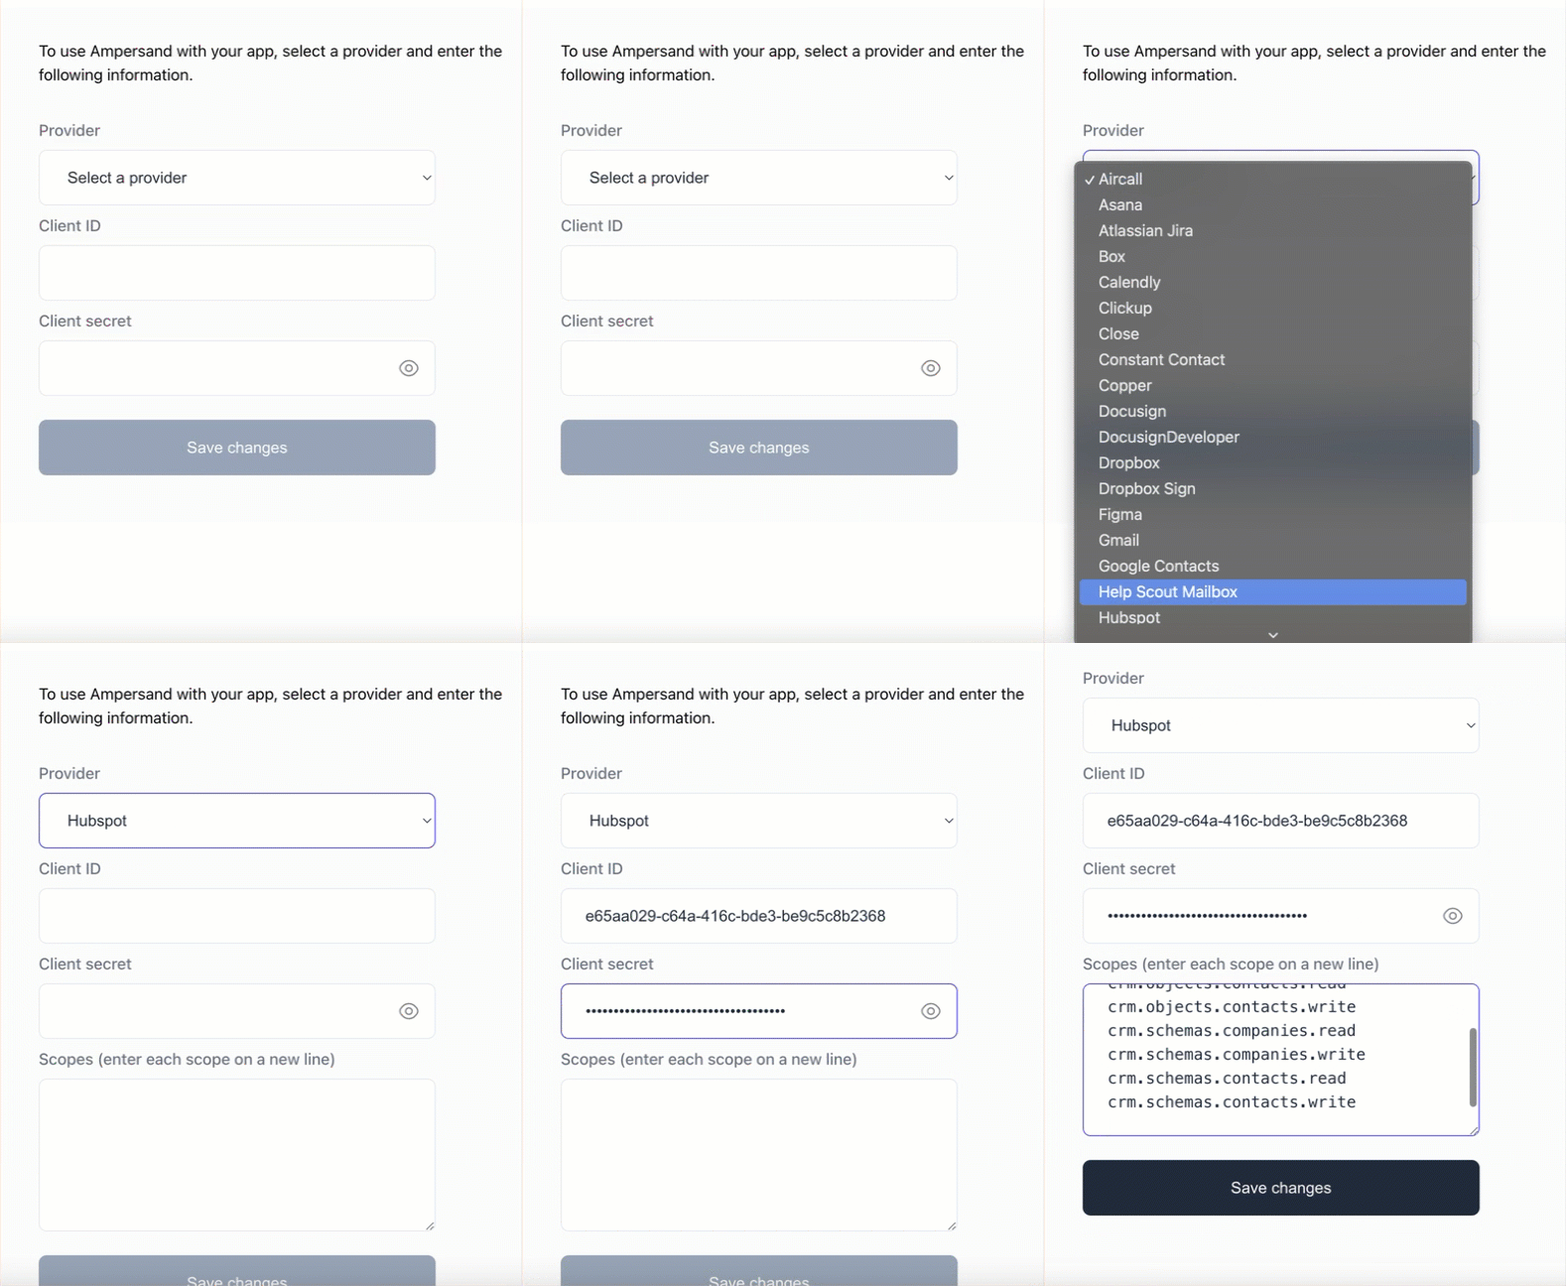 7. Click **Save changes**.
## Using the connector
To start integrating with Hubspot:
* Create a manifest file like the [example](https://github.com/amp-labs/samples/blob/main/hubspot/amp.yaml).
* Deploy it using the [amp CLI](/cli/overview).
* If you are using Read Actions or Subscribe Actions, create a [destination](/destinations).
* Embed the [InstallIntegration](/embeddable-ui-components#install-integration) UI component.
* Start using the connector!
* If your integration has [Read Actions](/read-actions) or [Subscribe Actions](/subscribe-actions), you'll start getting webhook messages.
* If your integration has [Write Actions](/write-actions), you can start making API calls to our Write API.
* If your integration has [Proxy Actions](/proxy-actions), you can start making Proxy API calls.
## Customer guide
The [HubSpot customer guide](/customer-guides/hubspot) is a guide that can be shared with your customers to help them be successful in using your integration.
7. Click **Save changes**.
## Using the connector
To start integrating with Hubspot:
* Create a manifest file like the [example](https://github.com/amp-labs/samples/blob/main/hubspot/amp.yaml).
* Deploy it using the [amp CLI](/cli/overview).
* If you are using Read Actions or Subscribe Actions, create a [destination](/destinations).
* Embed the [InstallIntegration](/embeddable-ui-components#install-integration) UI component.
* Start using the connector!
* If your integration has [Read Actions](/read-actions) or [Subscribe Actions](/subscribe-actions), you'll start getting webhook messages.
* If your integration has [Write Actions](/write-actions), you can start making API calls to our Write API.
* If your integration has [Proxy Actions](/proxy-actions), you can start making Proxy API calls.
## Customer guide
The [HubSpot customer guide](/customer-guides/hubspot) is a guide that can be shared with your customers to help them be successful in using your integration.